Affiliate Disclosure

i

A quick note on affiliate links

This article contains affiliate links. As an Amazon Associate, I earn from qualifying purchases. If you buy through one of these links, I may earn a small commission, and it never costs you a penny more. That income helps keep this site running and lets me keep writing detailed, honest reviews of home, kitchen and garden products.

Sunday, June 9, 2024

Elevate Your Buffet: The Ultimate Chafing Dish Handbook

Best chafing dishes for buffets and parties

Cold food is the fastest way to make a good dinner feel disappointing. You can spend two days on the cooking, and if the lasagna goes lukewarm before the second wave of guests gets to the table, that's what people remember.

A chafing dish fixes that. It sits over a small heat source and a water pan, so your food stays hot without drying out or scorching. I went through eight popular options on Amazon, from a gold-trimmed showpiece to a six-pack for big events, and wrote down what each one does well and where it falls short.

Affiliate disclosure: As an Amazon Associate, I earn from qualifying purchases. If you buy through the links below, I may get a small commission at no extra cost to you. Prices change often, so use the buttons to see today's price. Details in this guide were checked in September 2026.

Quick picks

PickBest forCapacity
Winware 8 Qt Roll-Topfor a show-stopping buffet8 qt
ROVSUN 6-Packvalue for big events8 qt each
Sterno 70153all-in-one starter set8 qt
Tiger Chef Folding Framefor tight storage8 qt
Super Deal 5 Qtfor smaller gatherings5 qt
Cuisinart 7BSRT-31for home entertaining5 qt

The 8 chafing dishes, reviewed

Winware 8 Quart Stainless Steel Gold-Accented Roll-Top Chafer
Best for a show-stopping buffet

Winware 8 Quart Stainless Steel Gold-Accented Roll-Top Chafer

  • Capacity: 8 qt
  • Lid: Roll-top
  • Finish: Stainless + gold accents
  • Size: Full-size

This is the one guests notice from across the room. Polished stainless steel, gold-tone accents, and a roll-top lid that stays open at whatever angle you leave it, so nobody has to hunt for a spot to park a lid while holding a serving spoon. It's a full-size, 8-quart setup, plenty for a big tray of baked ziti.

What's good

  • Gold accents make a plain buffet look catered
  • Roll-top lid solves the where-do-I-put-the-lid problem
  • 8 quarts covers a large crowd

What to watch for

  • The gold look isn't for everyone
  • Takes up real table space, so measure first
  • Keep an oven mitt nearby, the handles can get hot
Nova 8 Quart Full Size Stainless Steel Chafing Dish
Best for a clean, modern look

Nova 8 Quart Full Size Stainless Steel Chafing Dish

  • Capacity: 8 qt
  • Finish: Mirror stainless
  • Lid: Built-in lid holder
  • Handles: Cool-touch

Mirror-finish stainless steel, a lid holder and cool-touch handles: the practical basics are all here. At 8 quarts it holds a serious amount of food (think a full pan of chicken alfredo), and the handles make it far less nerve-wracking to shift around the table.

What's good

  • Sleek mirror finish suits modern tables
  • Cool-touch handles make moving it safer
  • Large capacity for big parties

What to watch for

  • Mirror finish shows fingerprints, so wipe it down before guests arrive
  • Too big for a small gathering
  • Heavy once it's full
Super Deal 5 Qt Full Size Stainless Steel Chafing Dish
Best for smaller gatherings

Super Deal 5 Qt Full Size Stainless Steel Chafing Dish

  • Capacity: 5 qt
  • Finish: Mirror stainless
  • Lid: Lid holder
  • Handles: Cool-touch

Not every dinner needs an 8-quart pan. The Super Deal keeps the mirror finish and cool-touch handles in a smaller footprint that suits a family dinner or a modest party. It lists a lid holder, water pan and food pan; check the Amazon page to confirm whether a fuel holder is in the box before you order.

What's good

  • Right-sized for smaller events
  • Cool-touch handles
  • Polished mirror finish

What to watch for

  • 5 quarts runs out quickly at bigger parties
  • Confirm the fuel holder is included in your version
  • Mirror finish is a matter of taste
ROVSUN 8 Qt 6-Pack Full Size Stainless Steel Chafing Dishes
Best value for big events

ROVSUN 8 Qt 6-Pack Full Size Stainless Steel Chafing Dishes

  • Pack: 6 chafers
  • Capacity: 8 qt each
  • Finish: Mirror stainless
  • Extras: Lid holders, cool-touch handles

When you host big, buying six at once changes the math. Each is a full-size 8-quart chafer with a water pan, food pan, cover and fuel holder, plus built-in lid holders and cool-touch handles. Nobody needs six for a birthday dinner, but for weddings, fundraisers or a church potluck it's a practical way to equip an entire buffet line.

What's good

  • Six complete chafers in one order
  • 8 quarts each
  • Lid holders and cool-touch handles built in

What to watch for

  • Six large pieces take a lot of storage room
  • Overkill for casual gatherings
  • More to wash afterward
Tiger Chef 8 Quart Full Size Stainless Steel Chafer with Folding Frame
Best for tight storage

Tiger Chef 8 Quart Full Size Stainless Steel Chafer with Folding Frame

  • Capacity: 8 qt
  • Frame: Folding
  • Finish: Mirror stainless
  • Lid: Lid holder

The folding frame is the whole pitch. It collapses so the chafer can slide into a closet between events, and you still get a full-size 8-quart pan, a lid holder and a mirror finish.

What's good

  • Folding frame saves storage space
  • 8-quart capacity for large groups
  • Complete set with lid holder

What to watch for

  • Folding frames rarely feel as rock-solid as fixed ones
  • A solid lid means no peeking at the food
  • Check the handle style on the listing before buying
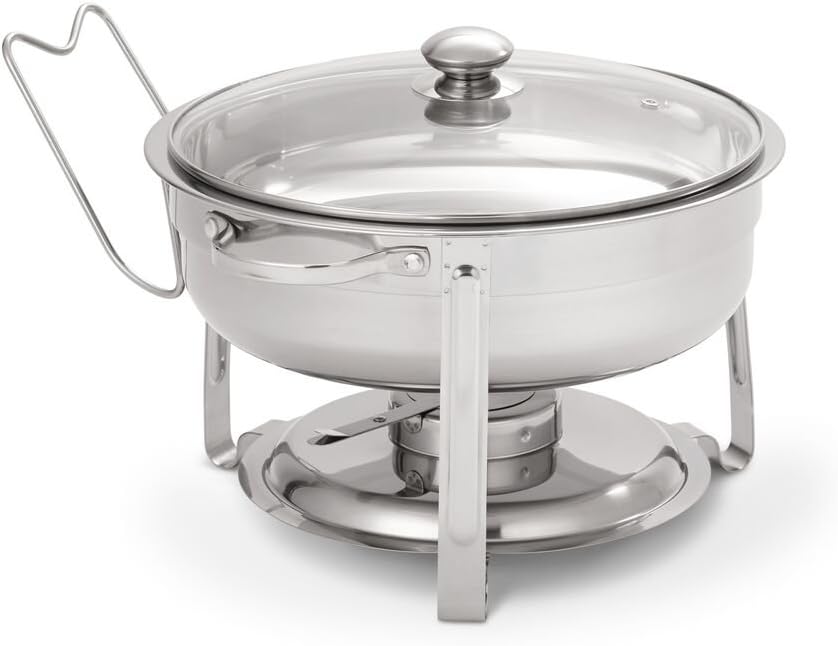
Artisan Stainless Steel Round Buffet Chafer with Glass Lid
Best for a small, pretty spread

Artisan Stainless Steel Round Buffet Chafer with Glass Lid

  • Capacity: 4 qt
  • Shape: Round
  • Lid: Glass
  • Includes: Stand + fuel holder

A round chafer with a glass lid, so guests can see what's inside before lifting anything. Four quarts is right for appetizers, a side dish or dessert at a small get-together, and the stand and fuel holder come with it.

What's good

  • Glass lid shows off the food
  • Round shape breaks up a row of rectangles
  • Stand and fuel holder included

What to watch for

  • 4 quarts is small for a big party
  • Round pans use more table space per serving
  • Glass needs gentle handling
Cuisinart 7BSRT-31 Classic Entertaining 12-Inch 5 Quart Rectangular Buffet Server
Best for home entertaining

Cuisinart 7BSRT-31 Classic Entertaining 12-Inch 5 Quart Rectangular Buffet Server

  • Capacity: 5 qt
  • Shape: Rectangular, 12 in
  • Heat: 2 tea lights
  • Lid: Glass

This one works differently from the rest. It keeps food warm with two tea lights instead of chafing fuel. The stainless pan has an aluminum-encapsulated base and can go from the oven or stovetop straight to the warming stand, and both the pan and glass lid are dishwasher safe. It's made for family dinners and holiday tables more than for catering.

What's good

  • Pan goes from oven or stovetop to the stand
  • Pan and glass lid are dishwasher safe
  • Limited lifetime warranty

What to watch for

  • Tea lights are a gentler heat source than chafing fuel, so it suits shorter home gatherings
  • 5 quarts limits how much you can serve
  • Glass lid needs careful handling
Sterno 70153 Foldable Frame Buffet Chafer Set
Best all-in-one starter set

Sterno 70153 Foldable Frame Buffet Chafer Set

  • Capacity: 8 qt
  • Frame: Foldable
  • Pans: 4 in water pan + two 2 in food pans
  • Fuel: Sold separately

Sterno makes the fuel most people use in their chafers, so it's no surprise this kit comes together neatly. You get a foldable frame, lid, fuel holder tray, two fuel holders, a 4-inch water pan and two 2-inch food pans. The frame folds flat for storage and transport, which is a real help if you host now and then rather than every weekend.

What's good

  • Everything you need to start serving is in the box
  • Frame folds for storage and transport
  • Straightforward setup and cleanup

What to watch for

  • Chafing fuel is sold separately
  • Two 2-inch pans are shallower than one deep pan, so plan your portions
  • A folding frame is less rigid than a fixed one

How to choose the right one

Match the size to your crowd. A full-size pan holds about 8 quarts, which suits big groups. For dinners under about ten people, a 4 to 5 quart chafer is easier to store and won't sit half empty.

Look at the lid. Roll-top lids stay out of your way. Lift-off lids need a lid holder or somewhere to rest. Glass lids let guests see the food, but they need gentler handling.

Check the handles. Cool-touch handles are worth it if you'll move the chafer while it's hot. Otherwise keep oven mitts handy.

Plan for the fuel. Most chafers use canned chafing fuel, and some kits don't include it. Read the listing so you're not shopping for fuel the day before your party.

Think about storage. A folding frame is a real advantage if you'll pack it away after each event.

Frequently asked questions

How hot should food stay in a chafing dish?

Aim for 140°F (60°C) or higher. A quick check with a food thermometer is the easiest way to be sure.

How long can food sit out on a buffet?

Food safety guidance generally says no more than two hours at room temperature, and one hour if it's hotter than 90°F (32°C) outside. Refill from the kitchen in smaller batches instead of piling everything in at once.

Do I need to put water in the chafer?

Yes, for chafers that come with a water pan. The water gently spreads the heat so food stays warm without burning on the bottom. Use hot water to get started faster, and check the level during long events.

Can I use a chafing dish without fuel?

Only if it's an electric model. The chafers in this list use fuel (or tea lights, in the Cuisinart's case), so plan for it ahead of time.

The bottom line

If you want something that looks impressive and handles a crowd, the Winware roll-top is hard to ignore. For big events, the ROVSUN six-pack is the practical pick. If you host a few times a year and need it to fold away, look at the Sterno 70153 or the Tiger Chef. And for a smaller family table, the Super Deal or Cuisinart will do the job without taking over your kitchen.

Whichever you choose, keep the food hot, keep the water pan topped up, and nobody will be eating cold lasagna at your party.

The Electrifying Kitchen Hero: The Electric Skillet

Electric skillet guide: how to choose and use one

Most kitchens have one pan that does far too much work. It fries the eggs, browns the chicken, simmers the sauce, and by dinnertime it's stacked in the sink with three other things waiting for it. An electric skillet is the appliance that takes some of that pressure off. It's a wide, deep pan with its own heating element built in, so it doesn't need a burner, and it holds a steady temperature while you get on with everything else.

It isn't glamorous, and that's part of why so many people overlook it. But once you understand what it does well, and where it doesn't, it can become one of those tools you reach for every week. This guide covers how electric skillets work, what they cook best, how to pick one without overspending, and how to look after it so it lasts. No hype, just the practical stuff.

The short version

If you only have a minute, here's the quick summary. An electric skillet is a good buy if you cook for a family, entertain now and then, have a tiny kitchen or a weak stove, or just want a dependable second cooking surface. It's a poor substitute if you need a screaming-hot sear or you already own a full set of good cookware you love.

What to checkWhat's typicalWhy it matters
SizeSmall: 6 to 10 in. Medium: 10 to 14 in. Large: 14 to 16 in.Decides how many people you can feed in one go
DepthAbout 2 in. on medium models, around 3 in. on large onesDeeper pans handle stews, sauces and splatter better
Temperature rangeRoughly 200°F to 400°F; some go higherLow end for warming and simmering, high end for browning
PowerAbout 1,000 W (smaller) to 1,500 W (large)Affects heat-up speed and how much load you put on the outlet
Cooking surfaceCoated cast aluminum is the most common; stainless steel exists tooAffects sticking, cleanup and how long the pan lasts
CleaningMany pans are immersible once the heat control is removedMakes washing far less annoying

What an electric skillet actually is

Think of it as a frying pan and a hot plate that were merged into a single appliance. The pan usually has a thick base that contains the heating element, a detachable temperature probe (often called the heat control) that plugs in at one side, and a lid, often made of tempered glass. The probe contains a thermostat. When the pan reaches the temperature you set on the dial, the element cycles off, then back on when it cools slightly, so the heat stays reasonably steady.

That last bit is the whole appeal. On a stovetop, you're the thermostat. You nudge the knob, watch the food, nudge it again. With an electric skillet you set a number and get on with chopping the vegetables. It's not laboratory-grade precision, and the actual temperature swings a little as the element cycles, but for everyday cooking it's steadier than most burners, especially older electric coils and finicky gas ranges.

Because the pan is wide and reasonably deep, and because the lid fits snugly, it can behave as a frying pan, a shallow braiser, a griddle, a small oven and a serving dish, depending on what you ask of it. That flexibility is why it's been a fixture in family kitchens for decades.

What it does really well

Breakfast for a crowd

Pancakes are the classic test. A large skillet gives you room for a row of them at once, and the steady heat means the last pancake looks like the first, rather than pale or scorched because your burner drifted. Bacon, sausages, hash browns, French toast and scrambled eggs all work the same way. On a weekend morning, it's easy to keep everything warm on the lowest setting while the rest catch up.

One-pan dinners

Chicken and rice, sausage with peppers and onions, chili mac, beef stroganoff, shrimp and vegetable stir-fries, even a big pan of fajita fillings: this is where the skillet earns its place. The high sides keep ingredients in the pan while you stir, and the lid lets you switch from browning to a gentle simmer without moving anything to another pot. Fewer dishes is not a small benefit on a busy weeknight.

Frying without the drama

Shallow frying is easier when the oil temperature doesn't wander. Fried chicken, breaded cutlets, fish fillets and fritters all benefit from consistent heat, and the deeper walls mean less oil on your countertop. Use a proper oil thermometer if you want to be exact; a dial number on the control is a guide, not a promise.

Gentle baking and roasting

Put the lid on, keep the temperature moderate, and a skillet can bake cornbread, biscuits, small cakes or a casserole, and roast a small chicken or a cut of pork. It won't replace your oven for large batches, but on a hot summer day, or in a place without an oven, it's a lifesaver. It also uses less energy than heating a full-size oven for a small meal.

Serving and keeping food warm

This is the most underrated use. Many models have a warm setting, and with a glass lid the pan looks presentable on a table. Cook the meatballs, then keep them warm right at the buffet. Bring it to a potluck, plug it in on arrival, and nobody eats cold food. If you host holiday dinners, it also gives you an extra "burner" when the stove is full.

Where it falls short

An honest guide has to mention the downsides. Electric skillets aren't perfect, and knowing the limits will save you from disappointment.

What it's good at

  • Steady, hands-off heat for everyday cooking
  • Big cooking surface that doubles as a serving dish
  • Works anywhere there's an outlet, no stove needed
  • Keeps food warm for a long time on a low setting
  • Usually easy to wash, and many are immersible

What to keep in mind

  • Won't sear like a very hot cast iron pan
  • Takes up counter space and cupboard space
  • Coated pans need gentle utensils and careful cleaning
  • The controller can't go in water, so wash with care
  • A big model on a small circuit can trip a breaker if shared

The searing point deserves a comment. Most skillets top out at around 400°F, which is fine for browning chicken or burgers, but a steakhouse-style crust needs more heat than most of these pans can deliver. You can still cook a good steak, just don't expect it to look like it came off a grill. If you want that, use cast iron on a burner and keep the electric skillet for everything else.

The truth about heat control

You'll often see "precise temperature control" in product descriptions. It's mostly true, with a caveat. The dial gives you a target, and the thermostat works to hold it, but the number printed on the dial is approximate. Pans differ, kitchens differ, and cold food dropped into a hot pan pulls the temperature down for a minute or two.

So treat the dial as a starting point. Here are the rough ranges most cooks find useful:

  • Warm or 200°F: holding food, gentle melting, keeping a buffet ready.
  • 250 to 300°F: simmering sauces, slow cooking with the lid on, cooking rice-based dishes.
  • 325 to 350°F: eggs, sautéing vegetables, pancakes and French toast on the cooler side.
  • 350 to 375°F: browning chicken, frying breaded foods, hash browns, sausages.
  • 375 to 400°F: searing and getting a quick crust on burgers or thin cuts.

These are guidelines. Give the pan a few minutes to preheat fully before you add food. Many models have a light that switches off when the target temperature is reached, which is a handy cue. A quick check with a splash of water works too: it should sizzle and skitter, not sit there or vanish instantly.

How to choose the right one

There are dozens of skillets on the market and many look nearly identical. The differences that matter come down to a handful of things.

Size and shape

Match the pan to the people you feed. A small 6 to 10 inch skillet suits one or two people, dorm rooms and RVs. A medium 10 to 14 inch model handles a family of four, enough for a full chicken dinner or a batch of pancakes. Large 14 to 16 inch pans are best for six or more, or if you like to cook once and serve everyone straight from the pan.

Round pans are compact and heat evenly around the edges. Square and rectangular pans use corners more efficiently for pancakes, bacon and grilled sandwiches, but they need more storage space. If you're torn, go for the shape that fits your cupboard and your usual meals.

Also check the depth. Around two inches is fine for sautéing and frying, but if you like stews, soups and saucy dishes, look for three inches or more. Shallow pans splash and overflow when you stir.

Pan material and coating

Most electric skillets use a cast aluminum base with a nonstick coating. Aluminum heats quickly and evenly, stays light, and doesn't cost much. The coating comes in a few varieties. Traditional PTFE nonstick is slick and widely used. Ceramic-style nonstick coatings are increasingly common, and some makers advertise theirs as PFAS free, which is worth looking for if that matters to you. Whichever you pick, the coating is the part that wears out first, so look after it.

Stainless steel skillets exist, too. They're very durable and don't have a coating to scratch, but food sticks more easily unless you preheat properly and use enough fat. They suit cooks who prefer a sturdier pan and don't mind a little extra effort. Look for a thick base, since thin pans develop hot spots.

Lid, handles and legs

A tempered glass lid lets you see what's happening without lifting it and letting heat out. If you cook tall roasts or big pieces of meat, a high dome lid gives you the room you need. Handles should stay cool to the touch, or at least be well insulated. The legs should hold the pan steady on the counter and keep the heat away from the surface beneath it, so look for solid, non-slip feet.

Wattage and outlets

Smaller skillets typically draw about 1,000 watts, and large ones often reach 1,500 watts. On a standard 120-volt household outlet, 1,500 watts pulls a bit over 12 amps, which is a big share of a typical 15-amp circuit. In practice this means you shouldn't run a large skillet on the same circuit as a microwave or toaster oven at the same moment. It's a small thing, but a tripped breaker in the middle of dinner is annoying.

Washing and storage

Look for a model where the pan can be immersed in water once the heat control is removed. That makes cleanup much easier than a pan you can only wipe. If you're short on space, some models come with a lid that stores upside down or a design that stacks neatly. Measure your cupboard before you buy, because these pans are bigger than they look online.

How to use it, step by step

  • 1. Set it up on a flat, heat-safe surface. Keep it clear of walls, cabinets and paper towels, and make sure the cord isn't dangling over the edge.
  • 2. Attach the heat control fully. It should click or seat firmly into the socket. A loose probe won't heat properly.
  • 3. Preheat to your target temperature. Give it a few minutes, and wait for the indicator light if there is one.
  • 4. Add oil or butter. Use a fat with a suitable smoke point for the temperature you're cooking at, and skip aerosol cooking spray on nonstick pans, since it can leave a sticky residue over time.
  • 5. Cook in batches if needed. Overcrowding drops the temperature and leads to steaming instead of browning.
  • 6. Use the lid intentionally. Lid on for simmering, braising and baking, lid off when you want moisture to escape and food to brown.
  • 7. Turn it off and unplug it. Remove the heat control from the pan before you wash it, and let everything cool first.

Practical tips for better results

Dry your food. Patting meat and vegetables dry before they go in the pan helps browning, because surface moisture turns into steam.

Don't skip the preheat. A pan that isn't fully up to temperature is the most common reason food sticks or turns out pale.

Use a thermometer for meat. It's the only reliable way to know when food is safe and juicy. The USDA recommends 165°F for poultry, 160°F for ground meats, and 145°F for whole cuts of beef, pork and fish, with a short rest for the whole cuts.

Use soft utensils. Silicone, wood and nylon are kinder to a nonstick surface than metal. Small scratches turn into big ones fast.

Leave room for the lid to seal. If you stack food up higher than the pan walls allow, steam escapes and the pan can't do its braising job.

Rotate food for even browning. Pans often run a little hotter near the edges or the element path, so moving items around helps.

Use the warm setting. When food is done, drop the dial to warm and keep serving from the pan.

Cleaning and care

Most of the trouble people have with electric skillets comes from cleaning, and most of it is avoidable. First, let the pan cool. Plunging a hot nonstick pan into cold water can stress the coating and, over time, warp the base. Second, always remove the heat control before washing, and never put it in water or the dishwasher.

For everyday cleaning, warm soapy water and a soft sponge are enough. Stuck-on food usually lifts if you let the pan soak for ten to fifteen minutes. Avoid steel wool and harsh scouring pads, which strip nonstick coatings. If the manual says the pan is dishwasher safe, the lid and pan may go through, but hand washing usually keeps the surface in better shape for longer.

Store the skillet dry, and if you stack pans, slip a paper towel or a cloth between them so the coating doesn't get scratched. Check the cord for kinks or damage every so often, and stop using the appliance if the cord or plug looks worn.

Safety basics

Electric skillets are simple appliances, but they get hot and they plug into the wall, so a few habits are worth building. Keep the appliance on a stable, level, heat-safe counter. Keep it away from the edge, since a pulled cord can drag a hot pan down. Keep the plug end and the heat control dry. If you use an extension cord, choose one rated for the appliance's wattage, and don't run it under rugs or across a walkway.

Watch for hot steam when you lift the lid, and tilt it away from your face. Don't leave hot oil unattended, and never move a pan of hot oil. If it's a nonstick pan, avoid preheating it empty at maximum temperature for a long time, since overheating can damage the coating. Finally, keep children and pets away from the cord and from the pan while it's in use.

Energy use, noise and storage

You'll sometimes hear that electric skillets are eco-friendly. That's a fair claim in a narrow sense: for a small or medium meal, heating a compact pan uses less energy than heating a full-size oven, and the manufacturers of some models say theirs is more efficient than a range burner. It isn't magic, though. The savings depend on how you cook, and a skillet that's left on for hours will use plenty of power.

As for noise, it's true that these pans are quiet. There's no fan and no motor. You'll hear the sizzle of the food and an occasional soft click as the thermostat cycles, which most people never notice. If you're cooking early in the morning or in a shared space, that helps.

Storage is the one real practical drawback. A 16-inch skillet is a big object. If cupboard space is tight, think about a medium-sized pan or one with a stackable lid.

Common mistakes to avoid

  • Skipping the preheat. This leads to sticking and uneven browning.
  • Overcrowding the pan. Food steams instead of browning. Cook in batches.
  • Using metal tools on a nonstick surface. Scratches shorten the life of the pan.
  • Washing the heat control. Water in the probe is a safety problem and can ruin it.
  • Using cooking spray at high heat. It tends to leave a residue that's hard to remove.
  • Buying too big. A giant skillet is wasted on one person and hard to store.
  • Trusting the dial completely. Use a thermometer for anything where the exact temperature matters.

Frequently asked questions

Can an electric skillet replace a stove?

For many meals, yes. But it doesn't replace a stove and oven for everything. Boiling a big pot of pasta, cooking several dishes at once, or baking large batches still calls for regular appliances. Think of it as a very capable extra.

Is an electric skillet good for frying?

Yes, especially shallow frying. The thermostat helps keep oil at a steady temperature, and the tall sides limit splatter. Use an oil thermometer for best results and never leave hot oil unattended.

What can I cook in one?

Pancakes, bacon, eggs, stir-fries, chicken dinners, stews, chili, pasta dishes, fried foods, casseroles and even cornbread or small cakes. It's also great for keeping food warm at parties.

Can I put it in the dishwasher?

It depends on the model. Never put the heat control in the dishwasher or in water. Some pans and lids are dishwasher safe once the control is removed, so check the manual, and know that hand washing is gentler on nonstick coatings.

Is nonstick or stainless steel better?

Nonstick is easier to cook with and clean, but the coating wears out and needs careful handling. Stainless steel is more durable, but food sticks more easily. Pick based on how you cook and how much effort you want to put into cleanup.

What size should I buy?

For one or two people, 6 to 10 inches is enough. For a family of four, aim for 11 to 14 inches. For six or more, or for serving buffet-style, choose 14 to 16 inches.

How hot does an electric skillet get?

Most reach roughly 400°F, though some go higher. That's plenty for everyday cooking, but not enough for a hard steakhouse-style sear.

The bottom line

An electric skillet is a practical, forgiving appliance. It won't change your life, but it will quietly make a lot of meals easier: breakfast for a crowd, one-pan dinners, tidy shallow frying, and hot food on the table at a party. The key is to buy the right size, look after the coating, and understand that the dial is a guide, not a guarantee.

If you cook for more than two people, or you often wish you had one more burner, it's worth serious thought. Pick a size that fits your cupboard, choose a pan and coating you're comfortable with, and give it a few weeks. Chances are it will earn a permanent spot on your counter.

Pond Picasso: Transform Your Pond with Pond Dye

Pond dye guide: colors, dosage and how to apply it

Every pond owner knows the moment. It's a warm week in late spring, the water has turned the color of pea soup, and the pretty reflection you were counting on has been replaced by a murky green film. You've tried raking, you've read three forum threads, and you're wondering whether it's time to give up and fill the whole thing with gravel.

Before you do, it's worth knowing about pond dye. It's one of the simplest, cheapest tools in pond care, and it does two jobs at once: it makes the water look better, and it quietly helps hold back the sunlight-hungry growth that turns ponds green. It won't fix everything, and it comes with some limits nobody mentions on the front of the bottle. This guide walks through how it works, which color to choose, how to work out the right dose, and how to use it without staining your hands, your dock or your patience.

The short version

Pond dye is a concentrated, water-soluble colorant, usually blue or black, that you pour into a pond. It tints the water and filters sunlight. Less light reaching the bottom means less fuel for algae and submerged weeds. It works best as a preventive step, ideally started early in the season, and it needs topping up every few weeks.

QuestionQuick answer
What does it do?Tints the water and blocks part of the sunlight that algae and underwater plants need
Does it kill algae?No. It works by limiting light, so it's mainly preventive
Common colorsBlue and black; some brands also offer blue-green shades
How fast does it spread?Usually within hours, and fully within a day or two
How long does it last?Roughly 30 to 60 days, depending on rain, sunlight and water flow
Safe for fish and wildlife?Makers of food-grade dyes say yes when used at the label dose

What pond dye is, in plain language

Think of it as sunglasses for your pond. The dye is a mixture of concentrated colorants dissolved in a liquid or packed into a dissolving packet. Once it's in the water, the pigment spreads out and absorbs part of the sunlight passing through the surface. The water looks deeper and richer, and less light gets down to the bottom where weeds and algae begin their growth.

Many manufacturers describe their products as food-grade colorants, and some say the formula contains little more than colorant and a few salts to keep it stable. That's reassuring, but it's still worth reading the label on the specific product you buy, since formulas and instructions vary from brand to brand.

What it does well

Makes the pond look better right away

This is the part people notice first. Within hours, murky or brownish water turns into a deep, even color. Blue gives you a clean, lake-like look. Black gives you a dark, mirror-like surface that reflects trees, sky and clouds. For ponds around a house, a patio or a garden, that reflection alone can be worth the price.

Slows down algae and underwater weeds

Algae and submerged plants need light to photosynthesize. Dye takes a slice of that light away. The effect is strongest when you start early, before the water warms up and before growth takes off. Some sellers advise beginning treatments as soon as the ice melts in colder regions and continuing through the season.

Gives the pond a bit of shade

Some manufacturers say the tint also helps keep water temperatures slightly lower, because less sunlight gets through. The effect is modest, so don't expect it to change a hot summer, but a little extra shade can't hurt fish that are already stressed by heat.

Is easy to use

There's no mixing, no equipment and no special training. Most products say to pour the dye around the edges in several places and let wind and water movement do the rest. Packets are even easier: you toss them in.

What it doesn't do

Honesty matters here, because plenty of disappointed buyers expected a miracle.

Where it helps

  • Improves the color and reflection of the water
  • Reduces light that fuels new algae and weed growth
  • Applies in minutes with no equipment
  • Works alongside other pond care methods
  • Costs little compared with most other treatments

Where it doesn't

  • Does not kill algae or weeds already growing
  • Does not remove excess nutrients from the water
  • Fades and needs repeat treatments
  • Won't hold in ponds with heavy inflow or overflow
  • Can shade out beneficial underwater plants

The point about existing growth is worth repeating. If your pond is already thick with algae, dye alone won't clear it. It filters the sunlight algae need, but it doesn't remove what's there. In that situation, you'd deal with the current growth first using whatever method suits your pond, then use dye to help keep it from coming back.

It also doesn't fix the underlying cause. Ponds turn green because there's too much sunlight, too many nutrients, or both. Fertilizer runoff, leaves, fish waste and decaying plant material all feed algae. Dye tackles the sunlight part, and the nutrient part is up to you.

Choosing a color

Blue

Blue is the classic. It's the one that turns a green or brown pond into something that looks like a resort lake. It's a good choice for ponds you want to look bright and inviting: swimming ponds, ornamental ponds, and ponds in a front yard where people will see them every day.

Black

Black is subtler and, for many people, more natural. It doesn't look inky in person. It gives the surface a deep, reflective quality, like dark glass. It's popular on farm and landscape ponds where you want the surroundings mirrored in the water. Sellers of black dye also say it blocks light from reaching the bottom, which is the same weed and algae benefit you get with blue.

Blue-green and other shades

Some brands sell blue-green or aqua tints. They tend to look natural in woodland settings, and they're a good compromise if blue feels too swimming-pool. Whichever you choose, check the label for the coverage rate, since it can differ from product to product.

Mixing shades

You can blend colors to get your own look. One seller suggests mixing four parts blue with one part black for a deeper, more reflective blue. If you experiment, do it in small amounts and wait a day for the color to fully develop before adding more, since it's much easier to add dye than to take it out.

How much do you need?

This is where most people get stuck, but the math is simple. Dye is dosed by volume of water, not by surface area, so depth matters as much as size.

Step 1: measure the pond. Multiply the average length by the average width, in feet, to get the surface area in square feet.

Step 2: find the average depth. Take a few depth readings, from the shallow end, the middle and the deep end. Add them up and divide by the number of readings.

Step 3: work out the volume. Multiply area by average depth to get cubic feet. To get acre-feet, divide by 43,560. To get gallons, multiply cubic feet by 7.48.

An example: a pond that's 100 feet long, 50 feet wide and 4 feet deep on average holds 20,000 cubic feet. That's about 149,600 gallons, or roughly 0.46 acre-feet.

Now check the label, because products differ. One brand recommends a quart per acre at a 4-foot average depth. Another lists a quarter gallon per acre-foot, which is the same as a quart. A third says a quart treats an acre 6 feet deep. That's exactly why you should follow the instructions on your bottle rather than a number from a blog. Using the example above, a product rated at a quart per acre-foot would need roughly 15 fluid ounces.

Pond size (average 4 to 6 ft deep)Typical liquid dose on one brand's label
1/4 acre8 to 16 oz
1/2 acre16 to 32 oz
1 acre32 to 64 oz
2 acres64 to 128 oz

Treat that table as an example, not a rule. Deeper water needs more dye, and if you want a stronger color, most makers say it's fine to add a little more, as long as you stay within the label's limits.

How to apply it, step by step

  • 1. Read the label first. Check the dose, the safety notes and any water-use instructions.
  • 2. Wear gloves and old clothes. Concentrated dye stains skin, clothing and porous surfaces.
  • 3. Pick a calm day. Light wind helps spread the color and keeps splashes off you.
  • 4. Pour at several points around the edge. Spreading it out speeds up mixing. For packets, toss them in at different spots.
  • 5. Let the water circulate. Wind, fountains and aerators all help the dye disperse. Color usually evens out within hours and settles in fully within a day or two.
  • 6. Wait before adding more. Give the shade time to develop before deciding it isn't dark enough.
  • 7. Rinse spills right away. A quick rinse of concrete, decking or stone prevents stubborn marks.

When to apply and how often

Earlier is better. Because dye is preventive, the ideal time to start is in early spring, before the water warms up and before algae take hold. In colder regions, some sellers suggest starting as soon as the ice begins to melt and continuing until the pond freezes again. In warm climates with no freeze, treat year-round.

How long it lasts depends on the weather. Rain dilutes it, sunlight breaks it down slowly, and any water flowing through carries it away. Expect the color to last somewhere between 30 and 60 days. One manufacturer suggests topping up with a quarter to a half of the original dose after three to six weeks. For ponds with a stream or overflow, some makers recommend treating more often, around every two weeks.

A good rule: don't wait for the color to fade completely. Once it's noticeably lighter, sunlight is already getting through, and you'll have to work harder to get ahead of it again.

Where dye fits in a bigger pond plan

Dye works best as part of a set of habits, not as a one-off fix. Here's how it fits with the other options:

  • Aeration. Moving water adds oxygen and helps prevent stagnation. A fountain or aerator also helps the dye spread.
  • Nutrient control. Keep fertilizer runoff, grass clippings and fallen leaves out of the water. Less food means less algae.
  • Beneficial bacteria and biological products. These help break down organic waste over time.
  • Planting. Floating and marginal plants shade the water and use up nutrients. Just be careful about combining them with heavy dye if you rely on submerged plants.
  • Physical removal. Skimming and raking remove what's already there, which dye won't do.
  • Approved algaecides or herbicides. If you already have a serious problem, follow the label and local rules. Some dye makers say their products are compatible with most aquatic algaecides and herbicides, but check the product instructions first.

What to look for when buying

Liquid or packets. Liquid concentrate is usually cheaper per treatment and easy to adjust for any pond size. Water-soluble packets are less messy and take the guesswork out of measuring for small to medium ponds.

Clear dosage instructions. A good label states how much to use per acre-foot or per volume, and how deep the rate assumes. If you can't find this, look for a different product.

Food-grade or non-toxic claims. Look for a clear statement that the product is safe for fish, pets and wildlife when used as directed, and check any water-use notes. One retailer's label, for instance, says not to apply directly to drinking water.

Color range. If you might want to blend shades, pick a brand that offers more than one.

Size and value. Small ponds are fine with a quart or a few packets, while large ponds are cheaper with a gallon or a bulk jug. Do the math on cost per treatment, not per bottle.

Safety and wildlife

Most pond dyes sold for this purpose are described by their makers as safe for fish, frogs, turtles, waterfowl, pets and livestock when used at the recommended rate. Some say the water can be used for swimming, fishing and irrigation once the dye has fully dispersed, typically after a few hours to a day or two. Read your own label, though, because rules and wording differ between products.

Stick to the dose. More dye doesn't mean better results, and going far beyond the label makes little sense. If you keep sensitive or expensive fish, such as koi, start with the low end of the recommended rate, watch how the fish behave, and add slowly if you need a deeper tint.

Because dye reduces light, it also reduces oxygen produced by plants and algae during the day. That's usually not a problem in a healthy pond, but if you have heavy plant growth and warm weather, keep an eye on oxygen and consider adding aeration.

Will I still see my fish?

Usually yes, at least near the surface. Dye doesn't block all light, so fish close to the top remain visible. In very clear water, fish deeper than about three feet can become harder to spot. If seeing your fish is a priority, choose a lighter tint and dose toward the lower end of the range.

Cleaning up stains

Once diluted in the pond at the right dose, dye generally won't stain surfaces that touch the water. The trouble is the concentrate. Spills on skin, concrete, wood or plastic can leave marks, so wipe or rinse them immediately with plenty of water. Keep it away from light-colored clothes, and store the bottle upright in a place kids and pets can't reach. If you use a pump or waterfall, some sellers say the dye may tint the pump or liner slightly but won't harm the equipment.

Common mistakes to avoid

  • Waiting until the pond is already green. Dye works best as prevention.
  • Guessing the volume. Measure the pond and use the label rate for your depth.
  • Expecting it to kill algae. It filters light and doesn't clear existing growth.
  • Forgetting to reapply. Set a reminder for roughly every four weeks.
  • Using it in a fast-flowing pond. The dye washes out quickly, so the money is wasted.
  • Ignoring nutrients. Fix runoff and debris, or the algae will come straight back.
  • Splashing concentrate. Wear gloves and rinse spills immediately.

Frequently asked questions

Is pond dye safe for fish?

Manufacturers of food-grade dyes say it is safe for fish and other aquatic life when used at the label dose. Always follow the instructions on your product.

How long does pond dye last?

Typically about 30 to 60 days, depending on rainfall, sunlight, temperature and any water flowing through the pond.

Does pond dye kill algae?

No. It reduces the sunlight algae need, which slows new growth, but it doesn't remove algae that's already there.

What color is best, blue or black?

Blue gives a bright, lake-like look. Black gives a deep, mirror-like surface. Both filter light in a similar way, so choose based on the look you like.

Can I swim in a dyed pond?

Many labels say yes once the dye has fully dispersed, but check the instructions for your product, and avoid applying dye directly to drinking water sources.

Can I use it in a small backyard pond or water garden?

Yes. Just measure the volume carefully, since small ponds need very small amounts, and keep in mind that it will shade underwater plants.

Will it stain my liner, rocks or dock?

At the recommended dilution, makers say it shouldn't stain surfaces. Concentrated dye can, so rinse spills right away.

Do I need to remove the dye later?

No. It fades over time through rain, sunlight and normal water exchange, so there's nothing to remove.

The bottom line

Pond dye is a small, practical step with a visible payoff. It makes the water look richer within hours, and if you start early and keep up with regular top-ups, it helps hold back the light that feeds algae and weeds. It isn't a cure for a pond that's already choking, and it doesn't replace good habits like keeping nutrients out and keeping the water moving.

If you're tired of murky water and want a quick way to make your pond look intentional, it's an easy place to start. Measure your pond, follow the label dose for your depth, choose the color you'll enjoy looking at every day, and set a reminder for the next treatment. Your pond, and your reflection in it, will thank you.

Choosing the Ideal Pan for Your Electric Stove: A Comprehensive Guide

How to choose the best pan for an electric stove

If you've ever moved from a gas range to an electric one, you probably noticed the change within a week. The pan that used to sear beautifully now rocks slightly on the burner. Water takes longer to boil. The sauce keeps scorching in one spot while the rest stays lukewarm. Nothing is broken. Electric cooktops simply work differently, and they reward a different kind of cookware.

The good news is that choosing the right pan for an electric stove isn't complicated once you know what the stove actually needs. It mostly comes down to a flat base, the right material and a sensible size. This guide covers all of it in plain language: the three types of electric cooktop, which materials work and which cause trouble, how to test a pan before you buy it, and how to cook and clean in ways that make both the pans and the stove last.

The short version

Electric cooktops depend on contact. The heat only travels well from the element into the pan if the two surfaces touch across the whole base. So the rules boil down to a few things: buy pans with a flat, smooth bottom, keep them roughly the same size as the burner, pick a material that heats evenly, and treat them gently so they don't warp.

Your cooktopWhat works wellWatch out for
Coil burnersAlmost any pan with a flat base; heavy-bottomed stainless and cast iron are greatWarped or thin pans that wobble on the coil
Smooth glass-ceramic topSmooth, flat-bottomed stainless steel, enameled cast iron, ceramic-coated and nonstick pansRough cast iron bottoms, warped pans and anything dragged across the glass
InductionAny pan that a magnet sticks to firmly, such as cast iron, magnetic stainless steel and clad cookwareCopper, glass, aluminum and ordinary anodized aluminum without a magnetic base

First, know which electric stove you have

"Electric stove" covers three quite different technologies, and the advice for each isn't identical. Your pan choice should start here.

Coil burners

These are the classic exposed metal spirals that glow orange. They're tough and forgiving, and they'll work with almost any flat pan. They also heat and cool slowly. When you turn one down, the coil keeps radiating for a while, so a pot can keep boiling after you've reduced the setting.

Smooth glass-ceramic cooktops

Here the heating elements sit under a flat sheet of glass-ceramic. They look sleek and wipe clean quickly, but the surface can scratch, and it can mark if sugar or melted plastic gets baked onto it. Pan bottoms matter far more here, because the glass shows every rough patch and every warp.

Induction cooktops

Induction is technically electric, but it works by creating a magnetic field that heats the pan itself rather than the surface. That means the pan has to be magnetic. Consumer Reports notes that cast iron, carbon steel and stainless steel pans generally work, while all-copper pans usually don't, and aluminum pans work only if they have a magnetic layer. Plain hard-anodized aluminum will not work on its own. It also recommends a flat bottom that touches the cooktop fully. The easiest test is to press a magnet to the underside. If it grips firmly, the pan will work.

Mixing these three up is the most common mistake in cookware advice, and it's why so many people buy a beautiful pan and find out too late that it doesn't work with their cooktop.

What makes a good pan for an electric stove

A flat, smooth base

This is the single most important feature. A pan that rocks, spins or leaves a gap under one side loses heat, cooks unevenly and can be hard on a glass top. To check, put the pan on a flat counter and press down on the rim. If it rocks, it's not flat. You can also lay a straight ruler across the bottom and look for light underneath. A pan with a slightly domed or dished base can be a problem, because it won't contact the element properly.

A base that's thick enough to stay flat

Thin pans warp. A pan can look flat in the shop and then bend the first time it goes from hot to cold. A heavier base, or one with several layers of metal, resists that. The extra mass also evens out hot spots, which matters on coil burners where the heat is concentrated in a spiral.

The right size for the burner

Matching the pan to the burner is a good starting point. A pan that's much smaller than the element wastes heat and, on a glass top, can overheat the center. A pan that's much bigger will have cool edges, because the element can't reach them. As a rough guide, aim for a base that's about the same size as the burner or slightly larger. Many cooktop manufacturers publish specific limits on how far a pan can overhang, so check your manual.

Comfortable, stay-cool handles

Heat travels along metal handles, especially on the longer cooking times electric stoves need. Look for handles that stay cool on the stovetop, that feel balanced when the pan is full, and that are securely riveted or welded. A wobbly handle on a heavy pan is a safety issue.

A lid that fits

Because electric burners react slowly, lids are your friend. A snug lid traps heat and lets you turn the burner down earlier. Glass lids let you check progress without lifting. Metal lids are sturdier. Neither is wrong, so pick whichever suits how you cook.

Materials, one by one

Stainless steel (especially clad)

Stainless steel is a favorite for a reason. It's durable, non-reactive, doesn't scratch easily and works on every type of electric cooktop, including induction if the steel is magnetic. On its own, though, stainless doesn't conduct heat especially well, which is why good pans have an aluminum or copper core sandwiched between layers of steel. This clad construction heats evenly and stays flat. Cheap single-layer stainless pans, by contrast, tend to develop hot spots and can warp.

Cast iron

Cast iron holds heat like a brick, which makes it superb for searing, frying and baking. It's also very durable. The trade-offs: it's heavy, it heats slowly, and on a smooth cooktop the rough bottom of a traditional pan can scratch the glass. Lodge, one of the best-known makers, itself cautions that non-enamel cast iron may scratch glass-ceramic tops because the bottom is naturally rough. If you use it, lift the pan rather than sliding it, and don't drop it. On coil and induction stoves, cast iron is an excellent choice.

Enameled cast iron

This is cast iron with a glassy coating. It's easier to clean, doesn't need seasoning and looks great at the table. Check the underside: a smooth finish is kinder to a glass top, while a rough, exposed rim can still scratch.

Aluminum and anodized aluminum

Aluminum is light, inexpensive and heats quickly. Bare aluminum can heat unevenly in thin pans, and it can leave marks on glass-ceramic if overheated. Anodized aluminum has a hardened surface that's more durable and evens out heat distribution. It's a smart choice for coil and glass tops, but as noted, standard anodized aluminum won't work on induction unless it has a magnetic plate in the base.

Carbon steel

Carbon steel is a lighter cousin of cast iron. It heats faster, responds quickly to changes in heat and is magnetic, so it works on induction. It needs seasoning like cast iron. It's popular with cooks who like to sear.

Copper

Copper conducts heat beautifully but is expensive, requires maintenance and doesn't work on induction on its own. It can suit a smooth top, but it isn't the practical choice for most home kitchens.

Nonstick: PTFE and ceramic

Nonstick pans are convenient, and for eggs, fish and pancakes they're hard to beat. The coating is the weak point. It wears out, and manufacturers generally advise avoiding very high heat and metal utensils. Traditional PTFE coatings begin to break down at very high temperatures, in the range of about 500°F (260°C), and the fumes can be dangerous to pet birds in particular. So keep nonstick pans on medium heat and never preheat one empty on high. Ceramic-based coatings are marketed as PFAS-free alternatives. They tend to release food easily at first, but many cooks find they lose their slickness sooner than PTFE. Expect to replace nonstick pans every few years, depending on use.

Best all-rounders for electric

  • Clad stainless steel: even heat, durable, works on all types
  • Enameled cast iron: holds heat and cleans easily
  • Hard-anodized nonstick: quick heat and easy release (not for induction unless magnetic)
  • Carbon steel: light, fast, great for searing

Use with care

  • Raw cast iron on glass: can scratch if dragged
  • Thin, cheap pans: tend to warp and wobble
  • Copper or plain aluminum on induction: won't heat
  • Any nonstick on very high heat: coating can degrade

How to test a pan before you buy it

  • The rock test. Put it on a flat counter and press the rim. It should sit still.
  • The ruler test. Lay a straight edge across the base and check for light underneath.
  • The magnet test. If you have induction, stick a fridge magnet to the base. It should hold firmly. A weak grip often means poor performance.
  • The weight test. Pick it up. A pan that feels flimsy in your hand will probably warp later.
  • The handle test. Give it a shake. Handles shouldn't wiggle or rattle.
  • The bottom check. Run your fingers over the underside. It should be smooth, especially on a glass top.

Building a small, sensible set

You don't need a 15-piece set. Most home cooks get by with a handful of well-chosen pans:

  • A 10 to 12 inch skillet. Stainless or cast iron for searing, plus a nonstick one for eggs.
  • A 3 to 4 quart sauté pan with a lid. For sauces, braises and one-pan dinners.
  • Two saucepans. Around 1.5 and 3 quarts, for grains, soups and reheating.
  • A stockpot. 6 to 8 quarts, for pasta and stock.
  • A Dutch oven. Enameled cast iron is the classic, for stews and bread.

Buy fewer, better pieces. On an electric stove, a warped bargain pan costs you more in frustration than a good one costs in money.

Cooking on an electric stove: tips that make a difference

Preheat patiently. Electric elements take longer to warm up. Give the pan a couple of minutes before you add food, especially on a smooth top.

Turn the heat down early. Because the element stays hot after you lower the dial, reduce the heat a little before your food reaches its peak. It's the electric equivalent of coasting to a red light.

Use the residual heat. Many dishes can finish off the heat. Turn the burner off a few minutes early, keep the lid on and let the leftover warmth do the last of the cooking.

Slide a pan to a cooler burner. If something is boiling over, moving it off the element is faster than turning down the dial. On a glass top, lift it rather than dragging it.

Match the pan to the burner. Use large pans on large burners and small pans on small ones. It saves energy and cooks more evenly.

Dry the base of your pan. Water or grease on the bottom can steam, spatter or bake onto the surface.

Use moderate heat for nonstick. Medium is usually enough. High heat just wears out the coating.

Looking after your pans and your stove

Let pans cool before washing. Cold water on a hot pan can cause thermal shock, and that's a common way for bases to warp. Give it a few minutes on a trivet first.

Use gentle tools. Wood, silicone and nylon protect nonstick surfaces. Metal utensils shorten a coating's life.

Skip harsh scouring on coated pans. A soft sponge and warm soapy water are enough for daily cleaning. Soaking loosens stuck-on food.

Avoid stacking without protection. Put a cloth or paper towel between pans, or hang them, so coatings don't scratch.

Keep the cooktop clean. On a smooth top, wipe up spills once the surface has cooled. Sugary spills can be especially stubborn if left, so check your manufacturer's cleaning instructions. Use a cleaner made for glass-ceramic rather than abrasive scouring powders.

Lift, don't drag. Sliding a heavy pan across glass is the easiest way to leave a mark.

Check the bottoms now and then. A pan that has started to warp, or has bits of burnt-on residue underneath, should be cleaned or replaced.

Why pans warp, and how to prevent it

Warping happens when metal expands unevenly. It's most common with thin bases and when a hot pan hits cold water. To avoid it, don't run a hot pan under the tap, don't leave an empty pan on a hot burner for long, and choose pans with a thick or multi-layer base. If a pan has already warped slightly, it may still work on a coil burner, but it will heat unevenly and can be a problem on glass or induction. At that point, replacing it is usually the safest choice.

Mistakes people make with electric cooktops

  • Buying pans without checking the base. A rounded or warped bottom wastes heat.
  • Assuming every electric stove is the same. Coil, glass and induction have different rules.
  • Using a pan that's too small or too large for the burner. It leads to hot spots or cold edges.
  • Dragging cast iron across glass. Lift and place it instead.
  • Cranking the heat to high. It rarely helps and often harms nonstick pans and cooktops.
  • Shocking hot pans with cold water. A slow cool-down protects the base.
  • Ignoring the manual. Your stove's maker may list specific pan limits or cleaning steps.

How long should a pan last?

It depends on the material. Well-made stainless and cast iron can last for decades with reasonable care. Nonstick pans usually last a few years, sooner with heavy use and high heat. Replace any pan that has a deeply scratched or flaking coating, a warped base that rocks, or handles that have gone loose. Replacing a worn pan isn't wasteful. It's what keeps your food cooking evenly and your cooktop safe.

Frequently asked questions

What is the best pan material for an electric stove?

There's no single winner, but clad stainless steel is the most versatile because it works on every kind of electric cooktop. Enameled cast iron and hard-anodized nonstick are also excellent for coil and glass tops.

Can I use cast iron on a glass top stove?

Many people do, but the rough bottom of traditional cast iron can scratch the glass. Lift instead of sliding, don't drop it, and consider an enameled or smooth-bottomed pan if you're worried.

Do I need special pans for induction?

You need magnetic cookware. Test with a magnet: if it sticks firmly to the bottom, the pan should work. Cast iron, carbon steel and magnetic stainless steel generally do.

Why does my pan wobble on my electric stove?

It's probably warped, or has a base that isn't flat. Thin pans and those exposed to sudden temperature changes are the most likely to warp.

What size pan should I use?

Choose a pan whose base is about the same size as the burner or a little bigger. Much smaller wastes heat, and much larger leaves cool edges.

Is nonstick safe on an electric stove?

Yes, if you use it on low to medium heat and replace it when the coating is damaged. Avoid heating an empty nonstick pan on high, since very high heat can damage the coating and release fumes that are particularly hazardous to pet birds.

Can I use aluminum pans on a glass top?

Yes, especially anodized aluminum, which is harder and heats more evenly. Avoid thin, cheap aluminum that warps easily, and keep it off high heat for long periods.

How do I stop scratches on my glass cooktop?

Use smooth-bottomed pans, lift instead of slide, wipe spills promptly and avoid abrasive cleaners. Follow your manufacturer's care instructions.

The bottom line

The best pan for an electric stove is the one that sits perfectly flat, suits your kind of cooktop and matches the burner. For most people that means clad stainless steel, enameled cast iron or a good hard-anodized pan, with one nonstick skillet for eggs. If you have induction, carry a magnet. If you have a glass top, lift your pans. And whichever you choose, give it a moment to cool before it meets the sink.

Get those few things right and an electric stove stops feeling like a compromise. It's a steady, dependable cooktop that simply asks for good contact, and your pans can give it exactly that.

Butter Dish: A Deceptively Simple Luxury in Your Kitchen

How to choose and use a butter dish

There's a small kitchen argument that never quite goes away. One person keeps the butter in the fridge, hard as a candle, and tears the toast trying to spread it. Another leaves it on the counter, soft and golden, and swears nothing bad has ever happened. Both sides are a little bit right, and a good butter dish is what lets you live between the two.

It's a humble object. Most people buy one on impulse, or inherit one, or use a saucer with a plate on top for years. But the right butter dish quietly changes a daily habit: it keeps butter clean, protects its flavor, and makes it spreadable when you need it. This guide covers what a butter dish actually does, how long butter is safe outside the fridge, which materials and styles are worth your money, and how to look after one so it lasts.

The short version

A butter dish protects butter from light, air, dust and kitchen smells, while keeping a small amount within easy reach. The best one for you depends on how fast your household goes through butter, how warm your kitchen gets, and whether you want soft butter on the counter or a tidy home for cold butter in the fridge.

Storage methodGood forKeep in mind
Covered dish on the counterSmall amounts you'll use within a day or twoBest in a cool room, away from heat and sunlight
Butter bell (crock)Spreadable butter for regular useUses water in the base, so follow the maker's instructions for changing it
Refrigerator butter dishLonger storage and everyday tidinessButter will be firm, and it can pick up fridge odors if uncovered
FreezerSpare sticks and bulk buysKeep wrapped; move one stick to the fridge or dish as needed

Why bother with a butter dish?

You might wonder whether it's just a pretty container. It's more than that. Butter is mostly fat, and fat is easily affected by its surroundings. Left exposed, it absorbs smells from the fridge or the kitchen, picks up crumbs and dust, and slowly changes flavor as light and air do their work. A butter dish deals with all of that in one go.

It protects flavor

Butter takes on strong smells easily. A half-cut onion in the fridge, leftover curry, a fish fillet on the next shelf: butter will absorb hints of all of them if it isn't covered. A lidded dish keeps it tasting like butter.

It keeps things clean

A covered dish keeps out dust, fruit flies and stray crumbs. It also stops that familiar smear of toast crumbs across the top of a shared stick.

It makes butter easy to use

A dish designed for the job gives you a place to rest a knife, keeps the butter from sliding around, and lets you pick up a pat without unwrapping paper with greasy fingers. Small conveniences, used every day, add up.

It looks good on the table

Lastly, yes, it can look nice. A well-chosen dish is a small touch that makes a breakfast table or a dinner spread feel a little more considered.

Counter or fridge? The honest answer

This is the question that comes up most, so it's worth answering carefully.

Butter has low water content and, when it's made, the water is dispersed as tiny droplets inside the fat. That makes it hard for most bacteria to grow. Salted butter has extra protection from the salt. This is why butter has a long history of being kept out at room temperature, and why so many households do it happily.

At the same time, the official guidance is more cautious than folk wisdom. The USDA's FoodKeeper guidance says salted butter can be left at room temperature for one to two days, kept in the refrigerator for one to two months, or frozen for six to nine months. Beyond a couple of days, the main risk is that butter turns rancid, with off flavors and smells, as fat slowly oxidizes. Heat and light speed that up.

Plenty of people keep salted butter out for longer, sometimes a week or two, in a cool kitchen with a good cover. It's a personal choice, but it's worth knowing the recommendation is shorter than the habit. A few sensible guidelines:

  • Keep only what you'll use soon on the counter. One stick, or less, is plenty for most households.
  • Use a covered dish. An open plate is an invitation for dust and insects.
  • Mind the temperature. A kitchen that stays around 70°F (21°C) or cooler is fine. In hot weather, move the dish to the fridge.
  • Be more careful with unsalted butter. It's more perishable, so it's better kept in the fridge and taken out shortly before you need it.
  • Keep unpasteurized or homemade butter refrigerated. That's the safer approach for those.
  • Don't leave margarine or spreads out for long. They're a different product with different rules, and are best refrigerated.
  • Trust your nose. If butter smells sour, tastes off, looks discolored or shows mold, throw it out.

If your household can't agree, there's a neat compromise. Keep a covered dish with a small amount on the counter, and store the rest in the fridge or freezer. That's the most common approach among people who love both soft butter and peace at home.

The main types of butter dish

The classic covered dish

A base and a lid, usually shaped for one stick. It's simple, inexpensive and works well on a counter or in the fridge. Look for a lid that sits snugly rather than rattling, and a base with a small lip so butter doesn't slide around.

The butter bell or crock

This is the clever one. The butter is packed into an upside-down cup attached to the lid, and the crock underneath holds a little cold water. When the lid goes on, the cup sits in the water, forming a seal that keeps out air. The design is often traced back to France, and it keeps butter spreadable at room temperature without leaving it exposed. It works best with salted butter, in a cool kitchen, and the water needs to be replaced regularly. Follow the maker's instructions for how often. It's not a place to leave butter for weeks, but for everyday use it's a very nice tool.

The refrigerator butter keeper

These are designed to live in the fridge. Some are tall and narrow to fit the door shelf. Others are simple boxes that hold a whole pound. They keep butter neatly contained and protect it from fridge smells.

The dish with a cutter

Some dishes include a built-in slicer or cutter, typically a wire or a marked tray, so you can portion out even pats of butter. They're handy for people who bake, or for anyone who likes tidy, uniform butter at the table.

The open serving dish

A small plate or dish with a dome or cloche, for the dinner table. It looks elegant, but it isn't meant for long-term storage. Think of it as a serving piece, and bring out a small portion of butter for the meal.

Choosing the material

Glass

Glass lets you see how much butter is left, doesn't hold onto smells, and is easy to clean. It's also inexpensive. On the downside, it can chip or break, and it doesn't insulate against room temperature. Fine for the fridge or a cool counter.

Ceramic and stoneware

Ceramic comes in endless colors and styles, feels solid and looks beautiful. The thicker material can take a little longer to warm up in a hot room, which helps keep butter from softening too fast, though the difference isn't dramatic. Check that the glaze is food-safe, and remember it can chip if knocked.

Porcelain and marble

Porcelain is smooth and easy to clean. Marble stays cool, which suits butter, but it's heavy and needs gentle handling. These are best for a nicer table setting.

Stainless steel

Steel is durable, doesn't break and doesn't absorb odors. It's a good choice for busy households and for anyone who worries about dropping things. It can show fingerprints and looks more modern than traditional.

Wood

Wooden dishes look warm and rustic, but wood is porous, so it needs proper care and shouldn't soak in water. They're often better suited to serving than to storage.

Plastic and silicone

Lightweight and cheap, plastic and silicone dishes are practical and hard to break. Some can hold odors or stain over time. They suit fridge storage or picnics.

Easy everyday picks

  • Glass: see-through, odor-free, simple to clean
  • Stainless steel: tough and low-maintenance
  • Glazed ceramic: attractive and solid
  • Silicone or plastic: light and unbreakable, good for travel

Things to watch

  • Glass and ceramic can chip or crack if dropped
  • Wood needs careful cleaning and drying
  • Cheap plastic can hold odors or stain
  • Sudden temperature changes can stress glass and ceramic

Getting the size right

This is where many people go wrong. Butter isn't one shape, and a dish designed for one style may not fit another.

In the United States, butter typically comes in quarter-pound sticks, and even those come in two shapes. The Eastern stick is long and thin, while the Western stick is shorter and thicker. Many dishes are sized for one or the other, and a few are made to accommodate both. European-style butter often comes in a larger block, commonly around 250 grams, which won't fit in a dish made for a standard stick.

Before you buy, check the dish's dimensions against the butter you actually use. Look at the packaging, or measure a stick. If you buy butter in one-pound blocks or make your own, you may need a larger dish, a crock or a fridge keeper. When in doubt, pick a dish with a little extra room, since squeezing butter in tends to crush it and make a mess of the lid.

Features worth paying attention to

A lid that fits. It should sit flat without tipping and cover the butter completely. A loose lid defeats the point.

A stable base. Non-slip feet or a weighted base stop the dish sliding around as you cut.

A comfortable knife rest. Some dishes include a small notch or handle so your knife has somewhere to go.

Easy cleaning. A smooth interior without deep grooves is easier to wash. Check whether the dish is dishwasher safe, since some glazes, lids and wood parts aren't.

Airtight or water-sealed designs. These offer better protection but need a bit more care. If you want a low-maintenance dish, a simple covered one is easier.

Size that fits your fridge or counter. A tall dish might not fit on a low shelf, and a wide one might crowd the counter.

How to use a butter dish well

  • 1. Start with clean, dry hands and a clean dish. It sounds obvious, but small bits of crumbs or water speed up spoilage.
  • 2. Put in a small amount. A stick, or less, for the counter. Store the rest in the fridge or freezer in its wrapper.
  • 3. Place the butter neatly. If you slice from a stick, keep the cut end covered by the lid.
  • 4. Use a clean knife. Don't double-dip a knife that has touched jam or crumbs. Keep a separate knife for the dish.
  • 5. Cover it after every use. The lid should go back on straight away.
  • 6. Keep it in the right spot. Away from the stovetop, toaster, window and any other heat or light.
  • 7. Replace the butter regularly. Don't top up old butter with fresh. Finish it, wash the dish and start again.

Softening cold butter without ruining it

If you keep butter in the fridge, you'll sometimes need to soften it fast. There are a few reliable tricks:

  • Grate it. A box grater turns a cold stick into fluffy shreds that soften in minutes.
  • Cut it into small cubes. More surface area, faster softening. Fifteen to thirty minutes on the counter is often enough.
  • Warm a bowl. Rinse a glass or bowl in hot water, dry it and set it upside down over the butter for a few minutes.
  • Microwave carefully. Use short bursts of about five seconds at low power, turning the butter between each. It's easy to overdo it and end up with a puddle.
  • Flatten between parchment. Tap it gently with a rolling pin. It softens through friction without melting.

For baking, many recipes call for butter at around 65°F (18°C), cool to the touch but soft enough that a finger leaves a dent. Butter that is too warm or melted can change the texture of cookies, cakes and pastry, so it's worth getting this right.

Cleaning and care

Wash after every stick. Butter leaves a thin film that can turn rancid and taint the next batch. Wash the dish thoroughly between sticks, and dry it fully before refilling.

Use warm, soapy water. A little dish soap cuts through fat. A soft sponge is enough for most dishes.

Check dishwasher instructions. Some glass and ceramic dishes are dishwasher safe. Wood, some glazes and decorative pieces generally aren't. If unsure, hand wash.

Avoid sudden temperature changes. Moving glass or ceramic from a hot dishwasher straight into a cold fridge, or pouring boiling water into a cold dish, can crack it. Let it cool first.

Skip abrasive scrubbers. Steel wool and harsh pads scratch surfaces, and scratches trap grease and bacteria.

For butter bells, change the water. Follow the manufacturer's guidance, since a stale water seal defeats the purpose. Rinse and dry the crock each time.

Store it dry. A damp lid or base breeds smells.

Mistakes people make with butter dishes

  • Leaving butter uncovered. It picks up dust, smells and bugs.
  • Keeping too much on the counter. Only put out what you'll use in a day or two.
  • Placing the dish near heat or sun. Butter softens, then spoils faster.
  • Topping up old butter. Finish the old stick before adding a new one.
  • Buying the wrong size. Check whether it fits the butter you actually buy.
  • Skipping the washing. Old butter residue makes new butter taste off.
  • Ignoring the signs of spoilage. If it smells or tastes sour, discard it.

A quick buying checklist

Ask yourselfWhy it matters
Where will it live, counter or fridge?Decides the style and material
What size butter do I buy?Stick, European block or pound block all need different dishes
How quickly do we use butter?Fast users can leave a small amount out, slow users should refrigerate
How much care do I want to give it?A butter bell needs water changes, while a simple dish doesn't
Is it easy to wash?You'll wash it often, so make it painless
Does it suit my table?A dish that looks good gets used and enjoyed

Frequently asked questions

Is it safe to leave butter out on the counter?

USDA guidance says salted butter can be left at room temperature for one to two days. Many people keep it out longer in a cool kitchen with a covered dish, but it may turn rancid over time. In hot weather, or with unsalted butter, refrigeration is the safer choice.

Does a butter dish keep butter fresh?

A covered dish protects butter from dust, light, air and odors, which helps preserve flavor. It doesn't stop butter from eventually spoiling at room temperature, so use it for small amounts you'll finish soon.

What's the best material for a butter dish?

There's no single best. Glass and stainless steel are easy to clean and don't absorb odors. Glazed ceramic looks lovely and feels sturdy. Pick based on where you'll keep it and how careful you tend to be.

How does a butter bell work?

Butter goes into a cup attached to the lid. The cup sits in a little cold water in the base, which forms a seal that keeps air out. Change the water regularly, and use it with salted butter in a cool room.

Can I keep butter in the freezer?

Yes. USDA guidance suggests frozen salted butter keeps for around six to nine months. Wrap it well, and move one stick to the fridge at a time.

Should unsalted butter be kept in the fridge?

Yes, that's the safer approach, since it's more perishable. Take it out shortly before you need it, and soften it using one of the quick methods above.

How do I know if butter has gone bad?

Sour or off smells, an unusual taste, darker or patchy color, and any mold are signs to discard it.

Can I put my butter dish in the dishwasher?

It depends on the material and manufacturer. Glass is usually fine, but wood and some glazes and decorated pieces are not. Check the care instructions, and hand wash if in doubt.

The bottom line

A butter dish is a small purchase that pays off every morning. It keeps butter clean, protects its flavor and makes it easier to use, whether you like it soft on the counter or cold from the fridge. Choose a size that fits the butter you actually buy, a material that suits your habits, and a lid that closes properly.

Then keep a little on the counter, the rest in the fridge, wash the dish between sticks and trust your nose. That's really all there is to it. And the next time you spread butter on warm toast without tearing the bread, you'll know exactly which quiet piece of kitchenware deserves the credit.

Tiny Sleepers, Big Dreams: How to Pick the Ideal Toddler Mattress

Toddler Mattress


The Importance of the Right Toddler Mattress

What's one thing that can help ensure your toddler’s good night's sleep? It's a comfy, supportive toddler mattress. Just like Goldilocks, your little one needs something just right. A toddler mattress isn’t just about comfort; it's also about supporting your little one's growing bones and ensuring a safe sleeping environment.

How to Choose a Toddler Mattress

Before you get lost in the toddler mattress jungle, let's break it down. Start with the basics: size, firmness, and materials. Look for a mattress that fits your toddler’s bed frame. Aim for the right balance between comfort and support when considering firmness. Consider eco-friendly, non-toxic materials for a healthy sleeping environment.

Mattress Types to Consider

There's more variety in toddler mattresses than in a toddler's moods. You have innerspring, memory foam, and hybrid mattresses to choose from. Innerspring mattresses offer firm support, while memory foam conforms to your child's body. Hybrid mattresses blend the best of both worlds.

The Price Game: Balancing Cost and Quality

Toddler mattresses come in a wide price range, just like your toddler's outfits. You could opt for a budget-friendly model or splurge on a high-end one. But remember, a high price doesn’t always mean better sleep. Prioritize quality, comfort, and durability over cost.

Making the Decision: Toddler Mattress Must-Haves

You've done the homework, now let's narrow down the must-haves. The mattress should be firm enough to support your toddler, but comfortable enough to ensure sweet dreams. A waterproof cover is a must for obvious reasons. Trust us, the 2 a.m. juice spill is a real thing.

Final Thoughts on Toddler Mattresses

Choosing the perfect toddler mattress isn't as daunting as it might seem. The right mattress will have your toddler dreaming of candy canes in no time. The wrong one? Well, we won’t go there. Make the right choice, and both you and your toddler will sleep soundly.

In conclusion, finding the perfect toddler mattress is as tricky as getting your little one to eat broccoli. But with the right information and patience, it's entirely achievable. After all, a well-rested toddler is a happy toddler. And we all know what that means - a happy parent! Now that's a dream worth chasing.

The Water Dance: Embrace the Beauty of the Oscillating Sprinkler

Oscillating Sprinkler

First off, let's dive right in. An oscillating sprinkler is the king of the backyard, the unsung hero of lush lawns. It's like a personal rain cloud for your yard, without the threat of lightning.

The oscillating sprinkler's dance is a beautiful ballet of hydration. Its moves are smooth and rhythmic, ensuring an even distribution of water. It’s an environmentally-friendly Michael Jackson moonwalking across your lawn.

Behind the Scenes: The Mechanics of an Oscillating Sprinkler

Like any star performer, an oscillating sprinkler has its backstage crew. It's not just magic, but a fascinating combination of engineering and design. The real magic lies in the understanding of the dance steps, just like the Cha-Cha!

Setting the Stage: How to Position Your Oscillating Sprinkler

When it comes to positioning your oscillating sprinkler, accuracy is key. It's like positioning the pieces on a chessboard. Every move counts, but there's no fear of a checkmate here!

Water Works: How to Adjust the Water Flow of Your Oscillating Sprinkler

Just as a great DJ controls the flow of music, you control the flow of water from your oscillating sprinkler. Finding that perfect rhythm isn't always easy, but when you do, it's like hitting the high note in your favourite song.

The Choreography: Adjusting the Spray Pattern of Your Oscillating Sprinkler

Adjusting the spray pattern of your oscillating sprinkler is where the real choreography happens. It's like arranging the steps of a synchronized swimming routine, just without the swimsuits.

Maintenance Moves: Keeping Your Oscillating Sprinkler in Top Shape

To keep your oscillating sprinkler dancing smoothly, regular maintenance is key. It's like tuning a musical instrument - you've got to put in the work to keep the melody sweet.

The Solo Performance: Using Your Oscillating Sprinkler for Specific Tasks

An oscillating sprinkler isn't just for watering lawns. It's a multi-talented performer that can tackle many tasks. Like a Swiss Army knife, it's versatile and ready for anything - just without the bottle opener!

Upgrade Your Ensemble: Choosing a High-Quality Oscillating Sprinkler

Not all oscillating sprinklers are created equal. Like auditioning performers for a Broadway show, it's essential to select the best for your ensemble. Remember, the star of your garden is only as good as its supporting cast.

The Standing Ovation: The Benefits of Using an Oscillating Sprinkler

Using an oscillating sprinkler can bring countless benefits. It's the encore to your gardening show, the standing ovation at the end of a well-performed play. Give your garden the hydration it deserves and watch it give a star performance in return.

In essence, an oscillating sprinkler is more than just a tool - it's the maestro of your garden, the conductor of your personal outdoor orchestra. So sit back, enjoy the show, and let the music, or in this case, water, flow. After all, who doesn't love a good water show, especially when your garden is the star performer!

Powered by Blogger.